
How to Create an Out-of-Bounds Text Effect in Photoshop
/
Who doesn’t love a good, eye-popping text effect? Check out how simple it is to create this cool, out-of-bounds look! It’s perfect for adding interest to your layouts, social posts, or—you could even use it as a sort of monogrammed profile pic!
Here’s some of my favorite samples:


Things You’ll Need:
A photo featuring a clear subject. Simple is better. You’ll be making a selection of your subject, so make it easy on yourself and either plan your shoot with this in mind or select your image carefully. It will also need to work with the shape of the letter you’ll be using, so some poses/compositions may lend themselves to the project better than others.
A main font (with body). Because your subject will (more or less) be placed inside the text character, you’ll want to avoid thin, lightweight type for your main font. I’m using the font duo Beautiful Minds in this example because not only is it gorgeous (😍), but it includes a pair of coordinating fonts (plus bonus design dingbats!) that complement each other quite nicely. But any font with some weight will work just dandy.
A contrasting supporting font. In this example I’ll be using the serif font that comes with the Beautiful Minds duo for the text effect, but the design will also include the accompanying script version for contrast.
Here’s a look at what I’m using here, a font family (with bonuses!) called, Beautiful Minds:

To get started, create a new type layer and set your capital letter (in this case, J for Jessa) in the font of your choosing. (I’m using the Serif Two typeface from the Beautiful Minds collection.)
Scale the letter to be almost as tall as your subject, and move into position. To make it easier to see how your subject is fitting within the letter, you can temporarily reduce the opacity of the type layer by pressing the number 5 on your keyboard (thus reducing opacity to 50%) or by dragging the Opacity slider in the Layers panel.
Here, I’ve positioned the letter so that the top of the subject’s head is slightly popping out from the top of the letter (right about at her hairline on her forehead), her right heel is inside the letter while the toe of the same foot is out, and her left foot is extending beyond the letter in the bottom right.

Next, we’ll load the shape of the letter as a selection. To do this, Cmd/Ctrl + click on the thumbnail for the type layer. You should see marching ants around the letter.
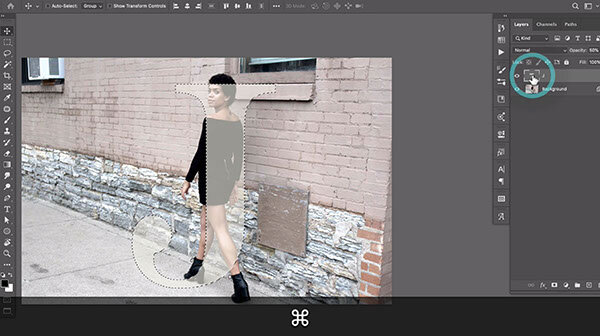
Once the selection is loaded, target the Background layer in the Layers panel, and add a layer mask by clicking the Add a Mask icon from the bottom of the Layers Panel (the third button from the left).
This makes the photo appear as if we’ve cut it into the shape of the letter J.
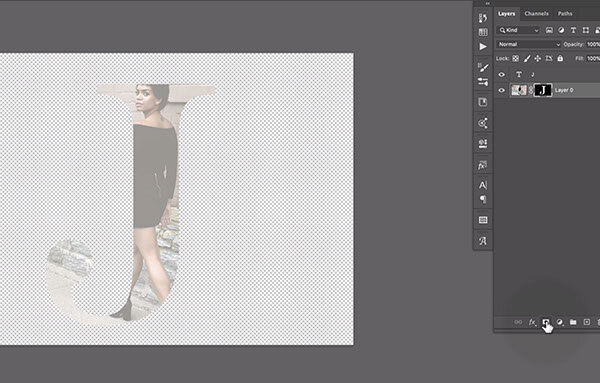
We no longer need the type layer, so you can drag it to the trash or just hide it by clicking the visibility icon (that looks like an eyeball) immediately to the left of the type layer thumbnail.
Next, we need to temporarily hide the layer mask (yes, even though we just added it!) so we can create the selection around the subject. So in the Layers panel, hold down the SHIFT key and click the mask thumbnail on Layer 0 (previously called Background). You should see a giant red X through it and the image should appear again as normal.

Be sure to click back to select the layer thumbnail (not the mask), then choose Select>Subject from the File menu. Photoshop will magically select your subject. (This fact still amazes me every time!)

With the subject selected, we can restore the layer mask we disabled earlier by SHIFT+clicking on the mask thumbnail in the Layers panel.

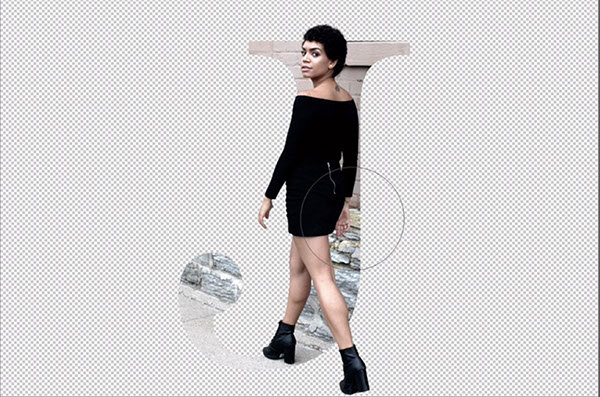
Now we have the photo in the shape of the letter J and we have a selection around the subject.
Making sure the layer mask is selected, grab the Brush tool (B), confirm that you have white for your active foreground color, and paint in the areas of where you want your subject to appear out-of-bounds. (Note that in this example, the subject is visible from head to toe. Depending on the composition of your image, you may need to leave some areas hidden “in-bound” the letter.)
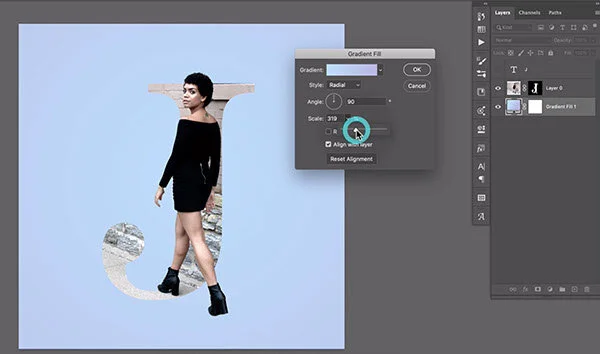
Looks great so far! To finish this off, crop the image into a square, then click the half-moon icon at the bottom of the Layers panel, and select Gradient to create a new background with some built-in depth. Choose your gradient and related settings (I went with one of the standard gradients in the “Blues” folder and changed the Style to Radial). Be sure to drag the adjustment layer below the layer with your image.
To add a subtle drop shadow to the image, click to select Layer 0 in the Layers panel, then click the FX icon at the bottom of the panel and choose Drop Shadow. (Choose your preferred settings. Mine are shown below.)

Using the Type tool, create a new type layer using your contrasting font. In this case, I’m using the Script Slant variation of the Beautiful Minds collection.

Type out your subject’s name using the font that you chose to contrast with your main typeface. Here, I opted to write the name in all lowercase to avoid detracting from the capital J used in the main font.

You did it! Wasn’t that easier than you thought?


